Vue3-Application API

createApp 创建App实例

  • 通过 createApp 创建 App 实例
  • 类似于 Vue2 中的 new Vue
1
2
3
4
5
6
7
8
9
10
11
const app = createApp({
name: 'MyApp',
data() {},
...
})

// 相当于 Vue2
const vm = new Vue({
name: 'App',
...
})

app.component

  • 全局注册 component 从原来 Vue2.0 的 Vue.component 移动到了 app 实例上
    • 传入正确参数,app.component 返回 app 实例
    • 未传入,app.component 返回 undefined
1
2
3
4
5
6
// Vue2.0
Vue.component();

// Vue3.0
const app = createApp(App);
app.component('组件名', 组件对象); // 全局注册

app.mount

  • 一般传入 rootContainer 根元素(#app

app.unmount

  • 组件从根元素上卸载

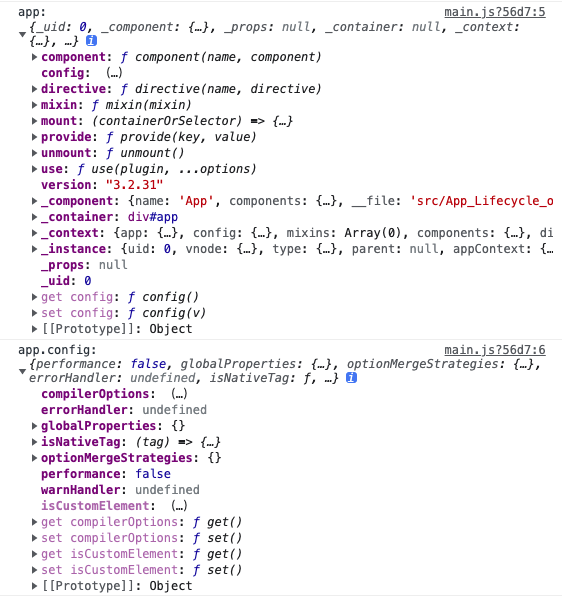
app.config

  • 包含 Vue 应用实例的全局配置
1
2
3
4
5
6
7
import { createApp } from 'vue'
import App from './App_Lifecycle_onRenderTracked_onRenderTriggered.vue'

const app = createApp(App)
console.log('app:', app);
console.log('app.config:', app.config);
app.mount('#app')

🌈 app.config.globalProperties

  • 对比 Vue2.0 中的 Vue.prototype.$http = 全局挂载

utils/index.js

1
2
3
4
5
6
7
function add(a, b) {
return a + b;
}

export {
add
}

main.js

1
2
3
4
5
6
import utils from '@/utils';
// Vue2.0
Vue.prototype.utils = utils;

// Vue3.0
app.config.globalProperties.utils = utils;

App.vue

1
2
3
4
5
6
7
8
9
10
11
12
13
14
<template></template>
<script>
import { getCurrentInstance } from 'vue';
export default {
name: 'App',
setup() { // setup 中使用全局挂载的属性或方法
const { proxy } = getCurrentInstance();
console.log(proxy.utils.add(1, 2));
},
mounted() { // 实例上使用
console.log(this.utils.add(1, 2));
}
}
</script>

组件与全局属性同名的props优先级更高

  • 组件如果接收的props属性名与全局挂载的属性名相同,则组件接收的props的优先级更高,会覆盖全局的属性

App.vue 传入同名 utils

1
2
3
4
5
6
7
8
9
10
11
12
13
14
15
16
17
18
19
20
21
22
23
24
<template>
<hello-world :utils="utils" />
</template>
<script>
import { getCurrentInstance } from 'vue';
import HelloWorld from '@/components/HelloWorld';
export default {
name: 'App',
components: {
HelloWorld
},
setup() {
const { proxy } = getCurrentInstance();
console.log(proxy.utils); // 这里还是 add
const utils = { a: 1 };
return {
utils
}
},
mounted() {
console.log(this.utils); // 这里也被改成了 { a: 1 }
}
}
</script>

HelloWorld.vue 组件接收

1
2
3
4
5
6
7
8
9
10
11
12
13
14
15
16
17
<template></template>
<script>
import { getCurrentInstance } from 'vue';
export default {
name: 'HelloWorld',
props: {
utils: Object
},
setup() {
const { proxy } = getCurrentInstance();
console.log(proxy.utils); // 变为 { a:1 }
},
mounted() {
console.log(this.utils); // 变为 { a:1 }
}
}
</script>

app.use 注册插件

  • 用途:
    • 使用一个插件
  • 参数:
    • plugin 插件
    • options 插件传入的配置

案例:自定义组件

libs/MyUI

  • index.js
1
2
3
4
5
6
7
8
9
10
11
12
13
14
15
16
17
18
19
20
21
22
23
24
25
26
import MyButton from './MyButton';
import MyInput from './MyInput';

const componentPool = [
MyButton,
MyInput
]
export default {
install(app, options) {
if (options.components) { // 按需加载
options.components.map(c => {
componentPool.map(component => {
console.log(component.name, c);
if (component.name === c) {
app.component(component.name, component);
}
});
});
} else {
// 默认全局加载
componentPool.map(component => {
app.component(component.name, component);
});
}
}
}
  • MyButton.vue
1
2
3
4
5
6
7
8
9
10
11
12
13
14
<template>
<button class="my-button"><slot></slot></button>
</template>
<script>
export default {
name: 'MyButton'
}
</script>
<style>
.my-button {
background-color: orange;
color: #fff;
}
</style>
  • MyInput.vue
1
2
3
4
5
6
7
8
9
10
11
12
13
14
15
16
17
18
19
<template>
<input type="text" class="my-input" :placeholder="placeholderText">
</template>
<script>
export default {
name: 'MyInput',
props: {
placeholderText: {
type: String,
default: 'This is my input'
}
}
}
</script>
<style>
.my-input {
border: 1px solid blue;
}
</style>
  • App.vue
1
2
3
4
5
6
7
8
9
10
11
12
13
14
<template>
<div>
<my-button>我的button</my-button>
<my-input placeholderText="my input"></my-input>
</div>
</template>
<script>
export default {
name: 'App',
setup() {

}
}
</script>
  • map.js 注册
1
2
3
4
5
6
7
8
9
10
11
12
13
14
15
import { createApp } from 'vue';
import App from './App_use.vue'

import MyUI from './libs/MyUI';

const app = createApp(App)

app.use(MyUI, {
components: [
'MyButton',
'MyInput'
]
});

app.mount('#app')

模板引用 template refs

  • 如果 VNode 的 ref 键对应于渲染上下文中的 ref,则 VNode 的相应元素或组件实例将被分配给该 ref 的值。
  • 模板 ref 和 setup 中声明的 ref 没有区别,也是响应式的,能够对应上 template 中绑定的 ref 引用

ref 绑定在元素上

1
2
3
4
5
6
7
8
9
10
11
12
13
14
15
16
17
18
19
20
21
22
23
<template>
<div>
<span ref="child">张三</span>
<button @click="changeName">改变名字</button>
</div>
</template>
<script>
import { ref } from 'vue';
export default {
name: 'Child',
setup() {
const child = ref(null);
const changeName = () => {
child.value.innerText = '李四';
console.log(child.value); // <span>李四</span>
}
return {
child,
changeName
}
}
}
</script>

ref 绑定在组件上

1
2
3
4
5
6
7
8
9
10
11
12
13
14
15
16
17
18
19
20
21
22
23
24
25
26
27
28
29
30
31
32
33
34
<template>
<div>
<child ref="child" />
<button @click="changeName">改变child内容</button>
</div>
</template>
<script>
import { ref } from 'vue';
import Child from '@/components/Child';
export default {
name: 'App',
components: {
Child
},
setup() {
const child = ref(null);
const changeName = () => {
console.log(child.value); // child 组件实例

// 改变名字方案1 - 通过 $el 获取 dom 更新
// const container = child.value.$el;
// const span = container.getElementsByTagName('span')[0];
// span.innerText = 'Lance';

// 改变名字方案2 - 直接调用 child 组件的 changeName 方法
child.value.changeName();
}
return {
child,
changeName
}
}
}
</script>

v-for 中绑定 ref

1
2
3
4
5
6
7
8
9
10
11
12
13
14
15
16
17
18
19
20
21
22
23
24
25
26
27
28
29
30
31
32
33
34
35
36
37
38
39
40
41
42
<template>
<ul>
<li
v-for="(student, idx) of students"
:key="idx"
:ref="el => { if (el) list[idx] = el }"
>
{{ student.name }}
</li>
</ul>
</template>
<script>
import { reactive, ref, onMounted } from 'vue';
export default {
name: 'App',
setup() {
const list = ref([]);
const students = reactive([
{
id: 1,
name: 'Lance'
},
{
id: 2,
name: 'GC'
},
{
id: 3,
name: 'Sherry'
}
]);
onMounted(() => {
console.log(list.value);
console.log(list.value[0]);
});
return {
students,
list
}
}
}
</script>